

Before getting into the scientific explanation of bond characteristics I'll mention some field experience so you won't have to concentrate too hard on the boring stuff.
There's always key points to keep you safe and productive during every project. Start off by taking a look at the adhesive page for a matrix of acceptable adhesives for different materials. This is one of the biggest problems for mechanics and structural techs out in the field. There are so many options for glue, it's difficult to pick one. The Adhesive page has a link to a 3M website and adhesive matching system. Check it out. Hysol may have the same. The are the primary manufacturer of structural adhesives and fillers in the aerospace industry. They are now part of the Henkel Co. Also, Loctite is a key player in the manufacture of structural adhesives, sealers and films. They too have ties to Hysol. Study the data and choose the right adhesive before crossing your fingers.
In the past I would tell everyone that unless the stuff is two part, it's probably junk. There's too many people looking for a quick way to get something glued together. Manufacturers strived to come up with single part adhesives but most wouldn't hold up to the test of vibration, oil, temperature and moisture. That's the four main qualities of a good adhesive.
Right away I will tell you of some excellent adhesives and why I use them.
 A4
Metal Set - Excellent qualities in many applications. Used in
Aerospace non-critical bonding. Honeycomb inserts, metal to metal.
Can be purchased at Smoothon.com. Good all around epoxy structural
adhesive to have around. Machines and sands easily. Similar adhesives include JB
Weld, 20/20, Marine Tex, Hysol 934 and other paste structural adhesives
A4
Metal Set - Excellent qualities in many applications. Used in
Aerospace non-critical bonding. Honeycomb inserts, metal to metal.
Can be purchased at Smoothon.com. Good all around epoxy structural
adhesive to have around. Machines and sands easily. Similar adhesives include JB
Weld, 20/20, Marine Tex, Hysol 934 and other paste structural adhesives
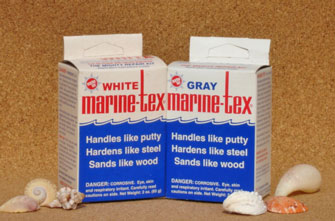 Marine Tex is an great structural adhesive. I could
swear this stuff is the exact same thing as Hysol EA 934. It smells the
same, mixes the same and works the same. Aerospace industry uses it for
liquid shim, bonding honeycomb and a myriad of other things. I used it on
the canopy of the RV for bonding and fairing in along the canopy frame.
It's hard as a rock and has the consistency of a paste...so its easy to
spread. It does not drip. It starts to cure after about 30
minutes. More hardener sets it a bit quicker.
Marine Tex is an great structural adhesive. I could
swear this stuff is the exact same thing as Hysol EA 934. It smells the
same, mixes the same and works the same. Aerospace industry uses it for
liquid shim, bonding honeycomb and a myriad of other things. I used it on
the canopy of the RV for bonding and fairing in along the canopy frame.
It's hard as a rock and has the consistency of a paste...so its easy to
spread. It does not drip. It starts to cure after about 30
minutes. More hardener sets it a bit quicker.
3M™ Scotch-Weld™ Epoxy Adhesive 2216 B/A Translucent 2216 is Excellent for bonding metal pieces subject to vibration. Dries hard but has a slight pliability, allowing crack free operations for brackets and other small metal pieces being bonded to firewalls and other steel surfaces. Runny on application. No need for heat. Slow cure. Can be brushed on.
1. Prime the surfaces of the layers to be bonded, i.e., cover the surfaces with a dilute solution of the adhesive mixed with an organic solvent to obtain a dried film thickness between 0.0015 to 0.005 mm (0.00006 to 0.002 in) and cure separated before applying the adhesive to bond the layers together.
2. Consider another adhesive. Epoxies are best, but an alloy such as epoxy-phenolic or epoxy-polysulfone may offer improved peeling resistance.
3. Dilute the adhesive until it has a lower surface tension than either of the bonding surfaces. The surface tensions can be compared by using a wetting test, i.e., by wetting the surface with the adhesive and measuring the "beading" angle. A low beading angle indicates good wetting and an appropriate adhesive. See Figure 2.1.
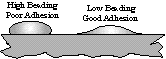
Figure 2.1 Beading/adhesion relationship
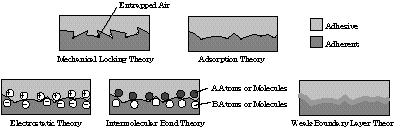
Figure 3.1 Dominant mechanisms of bonding )
According to the mechanical bonding theory, an adhesive must fill the valleys and crevices (the asperities) of each adherend (body to be bonded) and displace trapped air to work well. Adhesion is the mechanical interlocking of the adhesive and the adherend together, and the overall strength of the bond is dependent upon the quality of this interlocking interface. To this end, chemical or physical abrading is highly recommended for optimum bonding. Abrading the adherend (1) enhances the mechanical interlocking, (2) creates a clean corrosion-free surface, (3) forms a chemically reactive surface, and (4) increases bonding surface area. Diffusion bonding is a form of mechanical interlocking which occurs at the molecular level in polymers.
The adsorption mechanism theory suggests that bonding is the process of intermolecular attraction (van der Waals bonding or permanent dipole, for example) between the adhesive and the adherend at the interface. An important factor in the strength of the bond according to this theory is the wetting of the adherend by the adhesive. Wetting is the process in which a liquid spreads onto a solid surface and is controlled by the surface energy of the liquid-solid interface versus the liquid-vapor and the solid-vapor interfaces. In a practical sense, to wet a solid surface, the adhesive should have a lower surface tension than the adherend.
Electrostatic forces may also be a factor in the bonding of an adhesive to an adherent. These forces arise from the creation of an electrical double layer of separated charges at the interface and are believed to be a factor in the resistance to separation of the adhesive and the adherend. Adhesives and adherends that contain polar molecules or permanent dipoles are most likely to form electrostatic bonding according to this theory.
This theory has been developed to explain the curious behavior of the failure of bonded materials. Upon failure, many adhesive bonds break not at the adhesion interface, but slightly within the adherend or the adhesive, adjacent to the interface. This suggests that a boundary layer of weak material is formed around the interface between the two media. Impurities in the bond and adverse chemical reactions are common causes of weak boundary layers.
The two predominant mechanisms of failure in adhesively bonded joints are adhesive failure or cohesive failure. Adhesive failure is the interfacial failure between the adhesive and one of the adherends. It indicates a weak-boundary layer often from improper surface preparation or adhesive choice. Cohesive failure is the internal failure of either the adhesive or, rarely, one of the adherends. The difference is illustrated in Figure 3.2.
Ideally, the bond will fail within one of the adherends or the adhesive. This indicates that the maximum strength of the bonded materials is less than the strength of the adhesive strength between them. Usually, the failure of joints is neither completely cohesive nor completely adhesive. Measurement of the success of a particular joint is based on the relative percentage of cohesive failure to adhesive failure.

Figure 3.2 Adhesive and cohesive failure of bonded joints
All foreign materials, such as dirt, grease, cutting coolants and lubricants, water or moisture, and weak surface scales (e.g., oxides, sulfides), must be removed. Thorough cleaning with various physical or chemical processes removes these contaminants and conditions the surface for bonding. The process of cleaning the surface usually involves several of the following three steps: (1) solvent cleaning; (2) intermediate chemical and/or mechanical cleaning; and (3) chemical treatment. Priming may also be necessary.
Solvent cleaning is the process of removing soil from the surfaces from the adherend using an organic solvent without physically or chemically altering it. The following four processes employ solvent cleaning in an increasing order of severity:
A. Vapor degreasing. Hot solvent in vapor form condenses on the object to be treated and flows away debris.
B. Solvent wiping, immersion, or spraying.
C. Ultrasonic vapor degreasing. Ultrasonic excitation of thin layer of solvent on object. Cavitation of bubbles on surface of object provides scrubbing action.
D. Ultrasonic cleaning in solvent. Ultrasonic excitation with subsequent solvent rinse of object.
Intermediate treatment of the surface often includes grit blasting, wire brushing, sanding, abrasive scrubbing, scrapping or filing, and alkaline or detergent cleaning. These cleaning methods may be aggressive enough to remove some of the parent material.
Chemical treatment commonly includes acid or alkaline etching of the adherend surface. Etching the adherend removes stubborn oxides and roughens the surface on a microscopic scale. Solvent cleaning should always be performed before chemical treatment.
Occasionally, priming the surface may be necessary. Priming is the process of applying a dilute solution of the adhesive mixed with an organic solvent on the adherend to a dried film thickness between 0.0015 to 0.005 mm (0.00006 to 0.002 in). Priming protects the surface from oxidation, improves wetting, helps prevent adhesive peeling, and serves as a barrier layer to prevent undesirable reactions between the adhesive and the adherend.